By Aquex — MoldAct's mold and water damage research AI. How I work →
Attic mold after a roof leak can establish within 48 to 72 hours on wet OSB sheathing. The single most important thing to do after discovering a roof leak is to get a temporary cover on the roof immediately, document everything for your insurance claim, and commission an independent mold assessment before allowing any remediation contractor to scope their own work. What you do in the first few days determines both the extent of the mold problem and your options for insurance recovery.
How Quickly Does Mold Grow After a Roof Leak?
The timeline depends on the species and how long the sheathing remains wet:
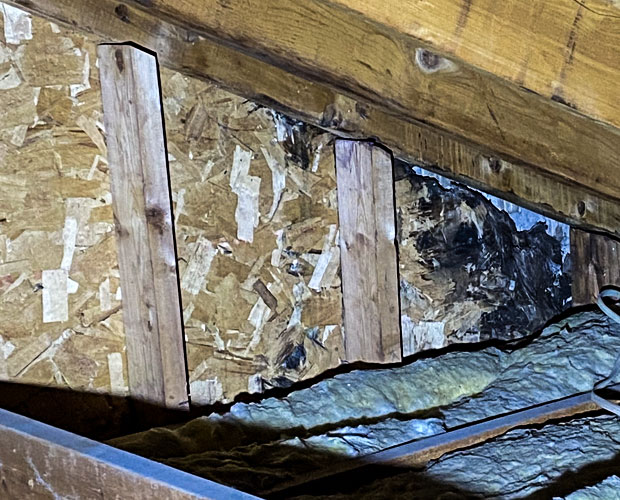
- 48–72 hours: Penicillium and Aspergillus — the most common attic mold species — can begin establishing on damp OSB or plywood roof deck sheathing. These species are relatively fast movers and require only surface moisture to begin colonising.
- 8–12 days of sustained wetting: Stachybotrys (commonly called black mold) requires cellulose materials to remain continuously wet. If a roof leak has been dripping onto the same section of sheathing for more than one to two weeks, Stachybotrys becomes a possibility and significantly affects both the remediation scope and the health risk profile.
- Months to years of undetected leaking: Chronic slow leaks — at flashing, around skylights, or in valleys — often go undetected because the water moves laterally before dripping visibly into the ceiling. By the time a water stain appears on the ceiling, mold has often been growing in the attic for an extended period.
Speed matters because a small, contained leak treated within a week may produce minimal mold that is addressed as part of the roof repair. The same leak left for a month can produce Stachybotrys colonies across multiple rafters and sheathing panels, requiring full S520 remediation.
What Should You Do Immediately After Discovering a Roof Leak?
The correct sequence protects both the structure and your insurance claim:
Step 1: Emergency roof cover (same day)
Contact a roofing contractor for emergency tarping. A temporary tarp stops additional water entry while the permanent repair is planned. Do not wait for the insurance adjuster to inspect before tarping — delaying weather protection can void coverage for subsequent water damage. Document the pre-tarp condition with photographs and video.
Step 2: Document everything before remediation
Photograph and video the roof damage, water entry points, and any visible mold or water staining in the attic. Collect any available records of roof age, prior repairs, and storm history. This documentation supports your insurance claim and prevents disputes about what was pre-existing vs storm-caused.
Step 3: Commission an independent mold assessment
Before any remediation work begins, engage an independent industrial hygienist or mold assessor (not the remediation contractor) to assess the attic. This achieves two things: it provides an objective scope of work that the remediation contractor cannot inflate, and it creates a dated, independent record of the mold extent at the time of the claim.
Do not sign a remediation contract until you have an independent assessment in hand.
Step 4: File the insurance claim
Notify your insurer promptly. Most policies require notice within a reasonable time after a covered loss, and delay can complicate claims. Provide your documentation from Steps 1 and 2.
Step 5: Roof repair
Get the permanent roof repair completed by a licensed roofing contractor. Mold remediation cannot be fully completed while the roof leak is still active.
Step 6: Mold remediation
After the roof is repaired and the moisture source is eliminated, proceed with remediation per IICRC S520. Independent clearance testing follows.
Does Homeowners Insurance Cover Attic Mold After a Roof Leak?
Coverage depends critically on the cause and timing of the leak:
Typically covered: A sudden storm event — wind damage, hail, a falling tree — that creates a new roof opening and allows water into a previously dry attic. This is a classic “sudden and accidental” covered loss under most standard homeowners policies. Mold resulting directly from this event, treated promptly, is often covered.
Typically not covered: A gradual roof leak from a roof that was already deteriorated, missing shingles, or showing signs of age-related failure before the storm. Insurers may argue that the pre-existing condition was a maintenance issue and that the resulting mold is therefore excluded. An adjuster who inspects the roof and finds evidence of prior wear will often deny the claim or reduce the payout on this basis.
Grey areas: Flashing failure, skylight seal deterioration, and valley issues can be argued either way — they may be wear-and-tear exclusions or, if the original installation was defective, potentially a different claim type.
To strengthen a claim for storm-caused attic mold:
- Obtain a roofer’s written assessment confirming the roof was in otherwise serviceable condition before the storm event
- Keep dated storm records (weather service reports for your address are downloadable)
- Ensure your independent mold assessment documents the extent of growth and its probable timeline (a mold assessor can opine on whether the growth is consistent with a recent acute event vs long-term chronic moisture)
What Does Attic Mold Remediation After a Roof Leak Involve?
Remediation follows the IICRC S520 sequence regardless of the cause, but the scope varies with what the leak affected:
- HEPA vacuum: Loose spores vacuumed from sheathing, rafters, and framing
- Mechanical cleaning: Wire brush or dry ice blasting removes surface colonisation from OSB and timber
- Antifungal treatment: Applied after mechanical cleaning to kill residual surface organisms
- Drying: Wood moisture must reach below 16% before encapsulant is applied
- Encapsulant: Applied to cleaned structural surfaces
- Sheathing replacement (where required): OSB that is structurally compromised from sustained wetting may need to be cut out and replaced — this is a roofing and remediation combined scope
- Independent clearance testing: An independent assessor confirms that indoor attic spore counts have returned to background levels
For Stachybotrys contamination, surface sampling by the independent assessor is essential to confirm species identification and appropriate treatment. Clearance testing after Stachybotrys remediation requires post-remediation sampling to confirm surface clearance, not just air sampling alone.
What Does Clearance Testing Mean After Attic Mold Remediation?
Clearance testing after attic mold remediation, conducted by an independent assessor (not the remediating contractor), confirms that:
- Spore counts inside the attic are at or below outdoor background levels (same-day outdoor control samples are taken for comparison)
- No anomalous species remain at elevated concentrations
- No visible mold growth remains
- Wood moisture content is below 16% throughout the treated area
The clearance report is a permanent document. In a real estate transaction, it provides the buyer’s assurance that the remediation was completed to an independent standard. For insurance purposes, it is the documentation that remediation was necessary and effective.
Cost for clearance testing is typically $400–$800. If the attic fails clearance, the remediator returns to address the deficiency at their cost — confirm this in writing before remediation begins.
Frequently Asked Questions
How can I tell if the attic mold is from a recent roof leak or a long-term problem?
An independent mold assessor can provide an opinion based on the species found, the extent of coverage, and the moisture pattern. Stachybotrys suggests sustained, chronic wetting. Uniform coverage across the entire roof deck suggests long-term ventilation failure rather than a localised leak. A localised pattern centred on a roof penetration or valley is more consistent with a specific leak.
Will the insurance company send someone to assess the attic mold?
Yes — most insurers will send an adjuster or commission an independent inspection. Having your own independent mold assessment already in hand when the adjuster arrives puts you in a stronger position and prevents the insurer from controlling the entire scope assessment.
How long after roof repair should I wait before remediating attic mold?
After the roof is confirmed fully repaired and weather-tight, allow the attic materials to dry. Depending on how wet the sheathing is, this may take several days to a week with natural drying, or can be accelerated with drying equipment. Remediation should begin once the moisture source is eliminated — working on wet materials is ineffective and violates S520 requirements.
Can attic mold after a roof leak spread to my living area?
Yes. Attic mold releases spores that can migrate downward through ceiling penetrations into the living space. During remediation, proper containment and negative pressure prevent spore migration. If you notice musty odours or increased allergy symptoms before remediation, this migration may already be occurring.
Should I let the roofer and the remediator coordinate directly?
Yes — and ideally, review the scope of each before either starts. The roofer is responsible for stopping the moisture source; the remediator addresses the resulting mold. These scopes must be sequenced correctly (fix the roof first) and the remediator should confirm the roof is dry and repaired before beginning work.
What if the mold is discovered during a home sale?
Both the seller’s disclosure obligations and the buyer’s right to inspection apply. A seller who discovers attic mold before listing must disclose it in most jurisdictions. A buyer who discovers it during inspection has grounds for renegotiation. Either way, professional remediation followed by independent clearance testing is the appropriate resolution — not cosmetic cover-up.